Sarah Philpott begins her book with a quote from George Bernard Shaw but I’m going to begin with a quote of hers:
“I’m a home cook, not a professional chef, but I’m passionate about inspiring others to eat well, simply, cheaply and above all, creatively.”
There is so much in this book and its origins that I can relate to. It’s the reason I started this blog, it’s the reason I still keep my Instagram, it’s the thing I think about in the shower, on the bus and rolling around at night when I can’t sleep. Food is a big part of my life and has been forever and reading through Sarah’s book I get where she’s coming from as a working class girl, growing up with food being a cornerstone of her life too.
Besides from the fact that we’re both Welsh and grew up in the nineties, there’s a lot in Sarah’s book that reminds me of my own complicated relationship with food. Food hasn’t always made me happy and I’m happy to sing that from the rooftops. I’ve struggled with an eating disorder, low self esteem and boughts of depression in my life that have been hard to deal with. Sometimes food has been my friend and at other times it has definitely been my enemy. It wasn’t until a few years ago (early 2015 to be exact) that my true passion for cooking and inventing food became a reality. Until then I’d been mostly living at home and my mother rules her kitchen with an iron rolling pin. Most of my suggestions for a splash of this and a dash of that fell on deaf ears. In fairness my Mam is an excellent cook so a lot of the time it was a case of “if it isn’t broke, don’t fix it!”. That being said I thrived on having my own kitchen and my own ingredients to play around with.
The title of the book belies the fact that Sarah is a full Vegan and she lays out her reasons and the argument for going Vegan right at the start. It’s a book aimed at people who may be on the cusp of going the whole nine yards, who have never considered it before or people who have already made the leap. Stacked from beginning to end with recipes which are self confessedly “easy to make”, her aim was to deliver “proper home cooking” and she achieves that with aplomb. You will find a blast from the past in this book, especially if you’re Welsh!
So, I’ve been lucky enough to get a hold of an advanced copy from Seren and I’ve spent some time pouring over it and decided to create two recipes from the book. The ‘main’, as it were, is her Beetroot Bourguignon, a brilliant and simple take on this classic French dish. For the second I chose and old favourite from my own past, her Bara Brith. I was especially keen to see how both coped with the translation from non to Vegan and I’m delighted to say both are absolutely delicious. I was also keen for something that would make a worthy meal for Easter Sunday, something classy but also casual and not too strenuous. As it happened I’d just returned from an epic walk and needed something that was easy to make and I was not disappointed.
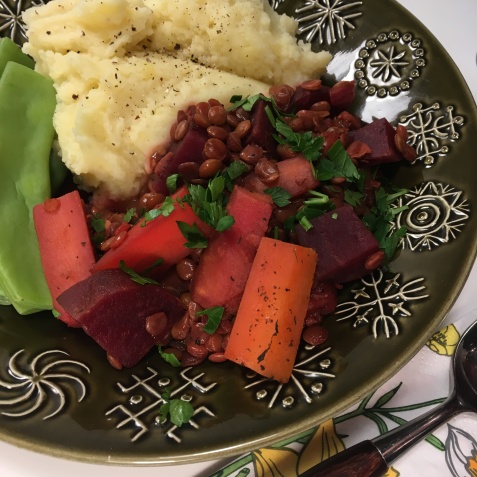
Beetroot Bourguignon
Both recipes are deceptively simple but this one I was a little more curious to see how it cooked. I’m used to slow cooking everything but this recipe is a wholly hob affair and works brilliantly. The recipe itself is super easy follow, made from ingredients that are readily available and cheap to buy. I halved the recipe for myself and my partner and it still made enough for us to eat the meal twice without being stingy on portion sizes. It calls for the veg to be chunky and this suits doing this meal fast with little fussy prep work beforehand.
One slight deviation I made was making my own stock. It calls for a lot of stock and/or wine and this is where the depth of the flavour really comes from. I made mine by peeling my veg over a simmering pot and chucking in the ends of the onions and the garlic, seasoning with a bit of salt and leaving it to bubble away while I continued with the recipe. After about 20-30 minutes it worked its magic and was ready to be used. It’s a great way of avoiding stock cubes (which can be pricey) and using up your food waste. It’s one of those little cheats you can pick up easily and will quickly become part of your cooking regime. Leftover snag ends of leek or cauliflower or broccoli, stick them in a bag and hide them in the fridge until you’ve got enough to brew away on the stove. You won’t regret it as it will really give your cooking character.
The only time the recipe really takes is the time it takes for the green lentils to finish cooking. Don’t be tempted to go red, they’re way too gritty and don’t have the heft and richness of green lentils when fully cooked. When they’re done the whole thing is, forgive the phrase, meaty and substantial. I love how the beetroot just permeates all the veg with a deep, ruby red quality so the whole thing just glows on the plate. You might also be surprised to know that the beetroot doesn’t overpower everything else, it’s the primary flavour don’t get me wrong, but it’s a deep and complex flavour that goes brilliantly with mash and fresh greens.

Bara Brith
For the Welsh, Bara Brith is an institution and as it was our first Easter in Malmö I was feeling a little bit of hiraeth (a Welsh word that defies literal translation but in essence means ‘a longing for home’). Translated, bara means bread and brith, as Sarah points out, “refers to the speckles of the dried fruit in the loaf”. It’s a classic, old school soaked fruit cake and is traditionally served with lashings of butter and tea. Traditionally they have egg and milk in them, which are, I’m happy to say, wholly redundant ingredients. It calls for a splash of non dairy milk but other than that all rising and binding duties are handled brilliantly by the rest of the ingredients. I regret to say I was a shade more dubious about this one than the bourguignon, maybe it was the blood of my ancestors crying out, but I’m thrilled to say my doubts were totally unfounded. The bake handles beautifully and the fruit maintain their succulence so each spiced bite comes away soft and sweet and bursting with flavour.
I deviated once more, fractionally this time, from the recipe as I used jumbo golden sultanas, as they are abundant in Malmö. As a variation on a theme they were a brilliant choice as they swell with tea to almost grape sized nuggets. I made sure to use Glengettie, a proper Welsh brew that my good friend Nia sent us in a care package from home, for the recipe as I knew that the common or garden black tea you get abroad wouldn’t cut the mustard. As for the recipe’s execution it couldn’t be much easier than this: soak fruit, measure dry ingredients, combine, stir and pour into a baking tin and cook until done. I would recommend watching over it for the last half an hour or so to check when the knife comes out clean as the fruit and the dough can make things a little deceptive. It makes quite the substantial loaf so it would be perfect for serving your friends and relatives if they come over. As a proud Welshman I couldn’t have been more impressed with the recipe and if you aren’t Welsh then I would recommend this as an alternative to the usual tea cake recipes. Perfect for a Welsh addition to a Swedish Fika (with some vegan butter and a sprinkle of Halen Môn salt, of course)!
Even though I’ve picked two of the more traditional recipes from the book, one of the things that excited me when reading it was the variety of the origins of her recipes. It’s a modern and worldly book and you can really feel her love for exciting and diverse flavours. I really can’t wait to make her porkless pie as it really excites me from a flavour and food innovation perspective. Easy to make, cheap to prepare and packed with hearty flavours, I’ve got to say I will be flicking through this one time and again for inspiration in the future.
Published By Seren Books, RRP £12.99
With Pictures by Manon Houston


